Tuesday, February 26, 2013

Popcorn Shrimp


    Hey guys! I made this really quick recipe the other day, and I thought I'd share. I'm an avid shrimp lover, so it's no surprise that I really enjoyed this recipe. If you love shrimp as much as I do, you should definitely give this a try. Now, on to the recipe. :)

Yield: 4 servings
Meal Type: Appetizer or side dish
Prep Time: 15 minutes
Cook Time: 10 minutes
Total Time: 25 minutes
Level: Easy
Misc: Serve warm


Ingredients

  • Vegetable oil for frying
  • 1 cup of flour
  • 1 cup of egg
  • 1/2 cup of milk
  • 1/4 teaspoon of minced garlic (or garlic powder. I didn't have garlic powder so I used minced garlic).
  • 1 cup of dry breadcrumbs 
  • 1 1/4 teaspoon of salt
  • 1/2 teaspoon of dried basil
  • 1/2 teaspoon of dried parsley
  •  1/8 teaspoon of onion powder
  • 24 uncooked medium shrimp, peeled and deveined.
Directions

Step 1: Place the flour in a bowl

Step 2: Whisk the egg, milk and minced garlic in another bowl. If you're using garlic powder, mix the powder in the third step.

Step 3: Combine breadcrumbs  salt, dried basil, dried parsley, onion powder and garlic powder (if you're not using minced garlic) in a third bowl.

Step 4: Gently press shrimp into flour to coat it, dip into the egg mix and press into breadcrumbs. Place the breaded shrimp onto a plate while breading the other ones. Do not stack them.

Step 5: Heat oil in a deep-fryer or large saucepan to 350 degrees F. Deep fry breaded shrimp in preheated oil until golden brown for 3 to 4 minutes. Then transfer the shrimp to a paper towel-lined plate to drain. And you're done!


Let me know if you have any suggestions, I'm always looking to improve my favorite recipes. :)

Bon Appetit,
Onivie

Sunday, February 24, 2013

Military Green & Lace


             Hey sweethearts! Hope you're all doing well. I'm currently in Boston helping my older sister plan her wedding, and also relaxing/catching up with sleep over spring break. The other day, I went out and about with my sister, Egiya and my girl, Jackie. It was such a productive day as we finally picked out her wedding dress which of course, got me emotional. I can't believe she's getting married, and it served as a huge reminder. I'm  so excited nonetheless! :)

          What I love most about this outfit is how the toughness of the military vest and combat boots complements the mildness of the lace and grey sweater. I finished this look with a black winter coat, and a coral handmade scarf which I crocheted myself - it's my first handmade scarf, hence my ardent love for it haha.


           Excuse my poorly done nails haha. The nail-polish color I have on is called Vintage Rose, I love it!


I intentionally left my shoelaces untied, to add a "rugged" feel to the look. :)


                                           Did something different with my hair - Milkmaid Braids


                                                       I clearly couldn't stop giggling all day!


                                                         Thai iced tea, always a favorite.


  We rounded up the day with dinner and a movie. For dinner, we went to this Vietnamese restaurant in Boston called Pho Basil. My camera died before I could take a picture of my meal, but I had some chicken satay (which came with a peanut sauce and vegetables) as an appetizer and gra pow fried rice (spicy fried rice with ground chicken, pepper, onion, egg and basil leaves) for my actual meal. I wasn't in the mood to experiment, so I played it safe - you can never go wrong with fried rice haha. It was so good and unlike any other fried rice I've ever had. I would definitely recommend this restaurant if you're ever in the area. Although, they always have long lines, so you might want to make a reservation prior to dinner.

--Rock My Look--
Military Vest, Grey Sweater, Lace Skirt, Gold Necklace & Purse - Forever21 
Black Tights - Express
Combat Boots (old) - Payless
Scarf - Hand-made by yours truly. :)

--Rock Jackie's Look-- (check out her blog here)
Grey Sweatshirt - Fine Ass Girls (shop here)
Purple Riding Pants - American Apparel
Shoes - Converse
Purse - Forever 21


Thanks for reading guys!

Xoxo,
Onivie

Thursday, February 14, 2013

Hand-made Button Love Pillow (Happy Valentine's Day!!!)


    Happy Valentine's Day everyone! I am definitely feeling the love today, and I'm so thankful for the amazing people God has placed in my life. In honor of Valentine's Day, I'm sharing this recently created beauty with you guys! Most people who know me well enough know I have a mild obsession with buttons! And so when I found this project on Pinterest, there was no way I could avoid giving it a try.

   I was originally looking for wedding ideas (my older sister's getting married, YAY!!!) on Pinterest when I bumped into this DIY project. It was tailored towards weddings and was referred to as a "Button Love Ring Pillow". I was not too keen on the idea of having it at a wedding, but I knew it would be a perfect fit with my beddings and the theme I have going on in my room as of present.

Unfortunately, I forgot to take pictures while sewing this. It took me about 8 weeks to complete because I didn't have a lot of time to work on it  (it should typically take 2-3 days if you're dedicated to it). However, if you're interested in making one of these, you can find a very detailed tutorial HERE. I modified it a little to make it simpler.

You Will Need
  • Two square sheets of cotton material. In the original project they used a blue material, but I went with cream because it goes better with my room. (The measurements of the square sheets will be dependent on how big you want your pillow to be :) ).
  • A small piece of pink cotton material (again you can choose a different color if you wish).
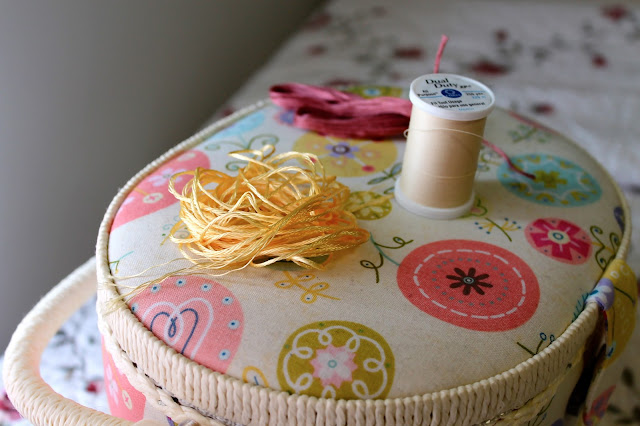
  • Sewing thread to match both materials. I used three different types of thread for this pillow. A Dual Duty all purpose cream thread to sew the pillow around and the buttons on the front side of the pillow, a pink embroidery thread to sew the heart onto the pillow, and a shiny cream embroidery thread to close up the pillow. Keep scrolling to view these threads.
  • LOTS of buttons! This was the most time consuming part for me - sewing on the buttons. I would have added more had I had more time, but I thought it looked good enough, and wanted to save some of my buttons for a future purposes. The tutorial does not show how to sew on buttons, so if you need help doing this, check out this link.
  • Ultra plush fiber poly-fil to fill up the pillow.
Again for the actual tutorial, click here. :)


    I love how colorful these buttons are. I mixed the colored ones with wooden buttons and floral ones too. I got some of the buttons from Jo-Ann Fabric & Crafts, but you can also buy them online here.


I used the shiny cream embroidery thread to close up the pillow and the pink to sew the heart onto the front side to the pillow. (Both gotten from Jo-Ann's)


I used this dual duty all purpose thread to sew the buttons onto the front side of the pillow, and to sew the two square sheets together. You can also use this thread if you are making use of a sewing machine. (Also gotten from Jo-Ann's)


     I used pins to initially hold the two square sheets together, before hand-sewing the pillow around. (Gotten from Jo-Ann, I obviously love this store! Lol.)


      Closing up the pillow. This could have been a much neater process, but hey, I'm still learning. :D

                     I used this to fill up the pillow (also gotten from Jo-Ann's). It's soooo fluffy!  

And you're done! It's pretty straightforward once you go through the tutorial and buy the stuff you need. Thanks for reading guys and let me know if you have any questions/concerns/suggestions. Remember to spread the love today, and may God bless you always with His unfailing love! :)

Xoxo,
Onivie

Friday, February 8, 2013

Baby It's Cold Outside


          I love experimenting with colors during the winter, and ended up rocking this look with a fur scarf and black gloves (forgot a take a picture of the entire outfit, sorry!). 


                         Hope everyone is having a great week thus far! Thanks for reading - Onivie xo!

             Zara Coat, Sweater & Pants - H & M, Travel Tote - Michael Kors, Wedged Boots - DSW

Sunday, February 3, 2013

Crispy French Toasts


Hi guys! So I figured I'd step aside from a cereal bowl every breakfast and put my favorite cereal to work by making new recipes as opposed to having it wallow in a pool of milk haha. For this recipe I used Honey Bunches of Oats and French bread to make crispy french toasts. Once again this is an easy and short recipe, which is always suitable for how hectic my schedule gets. As an alternative to Honey Bunches of Oats, you could use Frosties/Frosted Flakes, or  Corn Flakes. Whichever works best for you. Now, on to the recipe!

Yield: 4 servings
Meal Type: Breakfast
Prep Time: 15 minutes
Cook Time: 20 minutes
Total Time: 35 minutes
Level: Easy
Misc: Serve warm

Ingredients

  • 8 slices of French bread
  • 5 eggs
  • 1/4 cup of milk
  • I teaspoon of vanilla extract
  • 1/2 teaspoon of cinnamon
  • 4 - 5 cups of cereal (I used honey bunches of oats - honey roasted)

Directions

Step 1: Slice the bread into one inch thick slices.

Step 2: Crush up the cereal by placing it in a Ziplock bag, sealing and crushing with your hands or the back of a wooden spoon. When you're done with this step, place on a flat plate.

Step 3: In a bowl, whisk the eggs, milk, vanilla extract and cinnamon to combine.

Step 4: Heat 3 teaspoons of butter (or oil) in a pan.

Step 5: Dip each side of the bread in the egg mixture, then dip the soaked bread in the cereal and shake off excess cereal.

Step 6: Place the bread on your heated pan. Using a spatula, gently press the bread into the pan, helping it cook the centers of each slide. Adjust your heat if you notice your cereal getting too toasted before the egg cooks. Repeat this step with all the slices.

Step 7: Serve warm with maple syrup or honey, fried eggs, home-made fries and fruits of course (eating fruits after such meals make me feel better about myself haha). 

And you're done! I tend to use a different recipe sometimes to make French toasts and as an alternative to French bread, I use Country Potato or Honey Wheat bread. If you're interested in this *special* recipe, let me know! :)


                                     Hope you enjoyed this recipe! Thanks for reading - Onivie xo!